Guide on How To Create/Edit A Camera Group

Pearl de Guzman
Last Update één jaar geleden
How To Create/Edit A Camera Group

Organizing your video streams has been made easier with Camera Groups on the Live Video page. You can create multiple groups, providing the flexibility to switch between them as needed, ensuring a more customized video viewing experience.
To create a custom camera group:
Note: This default camera group, "All Cameras," provides a centralized location for viewing all video streams enrolled on the account. The user has the ability to switch between different camera groups, as per their viewing preferences.
- Log in to your account on the website.
- Go to the Video page.
- Access the settings by clicking the gear icon.
- Click on "New Camera Group."
- Select one or more cameras to include in the group.

Note: There is no limit to the number of cameras that can be added to a group.
6. To arrange the cameras in the group, select the desired order.
7. Provide a name for the group in the "Group Name" field.
8. Confirm the changes by clicking "Save Group."
Edit a camera group using the website:
The arrangement of cameras on the Live Video page mirrors the arrangement on the Edit Camera Group page. To edit the arrangement of cameras within a group, follow these steps:
- Log in to the Alarm.com customer website.
- Navigate to the Video page.
- Click the gear icon to access the settings menu.
- Select the desired camera group by clicking the ellipsis (...) next to it.
- Click the pen icon to edit the group.
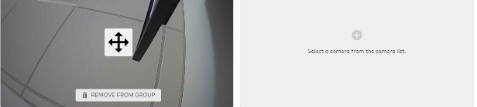
- Move the cameras within the group by hovering over the camera view and clicking and dragging the arrow icon. Drag the camera view to the + sign icon to confirm its new position.
To include an additional camera in a camera group:
- Access the Alarm.com Customer Website.
- Navigate to the Video section.
- Click the gear icon to access the configuration options.
- Select the desired camera group by clicking the ellipsis (...) button next to it.
- Select the editing option by clicking the pen icon.
- Choose the desired camera to add by clicking on it.

Note: There is no limit to the number of cameras that can be added to a group.
7. Click Save Group.
To delete a camera from a camera group:
- Access the Customer Website and log in.
- Navigate to the Video section.
- Click the gear icon to access the settings.
- Expand the camera list for the desired group by clicking the down icon.
- Locate the camera you wish to remove, then click the trash can icon to delete it.

If you have found this tutorial helpful, but still require further assistance, please don't hesitate to reach out for support.
Our team of live representatives is available to chat or answer any questions you may have through our toll-free number at 1-800-467-2337, or you can use our click2call webpage to call us directly from your device for free.